Dear Laravel Developers!
You are going to love me for this wonderful post!
Please feel free to buy me a coffee if you believe I saved you countless hours of research :-)
Having struggled for days on this issue, I decided to share my tips on setting up Laravel Websockets with a Self Signed Certificate and, without the use of pusher!
That’s right, no monthly payments are needed, you will have your own free WebSocket server for FREE, how cool!
We are going to pass the Laravel installation, and instead, jump right away to the WebSocket stuff.
Remember that you have two ways of setting up your own websockets, either you build your own websocket server(we will not cover this as it is not needed) and use many server software for this, or you host your own Laravel websocket server and get the exact same result. We will go for the last solution as it is quick and easy.
QUICK QUICK!
If you came here because you tried to set up your WebSockets via SSL and struggle……well well, if you think you have everything setup right but the SSL is still not working try 2 things, you do not need to read the entire tutorial, just try the below solutions.
1)If you are on a VPS with supervisor, restart it as the paths of your SSL in your .ENV won’t be cached otherwise, make sure you log as root via SSH and run these commands:
sudo service supervisord stop

sudo service supervisord start

sudo service supervisord status
If you are on a shared server, run this command:
php artisan websocket:serve
This should be enough to solve your SSL issue!
If you want the entire tutorial and would like to set up your websockets from scratch, here it is:
1)First, download this library:
https://beyondco.de/docs/laravel-websockets/getting-started/introduction
Run the 4 below commands to set it up:
composer require beyondcode/laravel-websocketsphp artisan vendor:publish --provider="BeyondCode\LaravelWebSockets\WebSocketsServiceProvider" --tag="migrations"php artisan migratephp artisan vendor:publish --provider="BeyondCode\LaravelWebSockets\WebSocketsServiceProvider" --tag="config"
2)Install this library which will use the pusher script but reroute the communication to your own websocket server instead:
https://laravel.com/docs/8.x/broadcasting
Command:
composer require pusher/pusher-php-server
3)Add these variables in your .env:
PUSHER_APP_ID=your-pusher-app-id
PUSHER_APP_KEY=your-pusher-key
PUSHER_APP_SECRET=your-pusher-secret
PUSHER_APP_CLUSTER=mt1BROADCAST_DRIVER=pusher
For the client-side, install Laravel echo + pusher js. Important note, yes we will use the pusher logic to push the communication to our own websockets(and not to pusher.com).
npm install --save-dev laravel-echo pusher-js
Add the code “in red” in your resources/js/app.js file:
window._ = require('lodash');

/**
 * We'll load jQuery and the Bootstrap jQuery plugin which provides support
 * for JavaScript based Bootstrap features such as modals and tabs. This
 * code may be modified to fit the specific needs of your application.
 */

try {
    window.Popper = require('popper.js').default;
    window.$ = window.jQuery = require('jquery');

    require('bootstrap');
} catch (e) {}

/**
 * We'll load the axios HTTP library which allows us to easily issue requests
 * to our Laravel back-end. This library automatically handles sending the
 * CSRF token as a header based on the value of the "XSRF" token cookie.
 */

window.axios = require('axios');

window.axios.defaults.headers.common['X-Requested-With'] = 'XMLHttpRequest';


/**
 * Echo exposes an expressive API for subscribing to channels and listening
 * for events that are broadcast by Laravel. Echo and event broadcasting
 * allows your team to easily build robust real-time web applications.
 */

import Echo from 'laravel-echo';

window.Pusher = require('pusher-js');

window.Echo = new Echo({
    broadcaster: 'pusher',
    key: process.env.MIX_PUSHER_APP_KEY,
    cluster: process.env.MIX_PUSHER_APP_CLUSTER,
    forceTLS: true,
    wsHost: window.location.hostname,
    wsPort: 6001,
    wssPort: 6001,
    disableStats: true
});
4)In config/websockets.php, make sure you have the config set up this way:
'apps' => [
    [
        'id' => env('PUSHER_APP_ID'),
        'name' => env('APP_NAME'),
        'key' => env('PUSHER_APP_KEY'),
        'secret' => env('PUSHER_APP_SECRET'),
        'path' => env('PUSHER_APP_PATH'),
        'capacity' => null,
        'enable_client_messages' => false,//This is to allow communication between clients, I selected false as my app does not support this.
        'enable_statistics' => true,
    ],
],
5)Go here and generate a FREE SSL(add your domain name):
https://www.sslforfree.com/
You will get 2 files, something like:
1968979879_yourdomain.com.cert

1968979879_yourdomain.com.cert
Move these 2 files in your Laravel installation, create a new SSL folder as:
Laravel/ssl/
To give you an idea of the app structure, it should be like this:
Laravel/app
Laravel/config
Laravel/boostrap
Laravel/ssl/
6)Now this part made me lose days!!!!!!! Make sure you do not forget the double quotes on the path or the SSL won’t be picked up!
Add these 2 variables in your .env:
LARAVEL_WEBSOCKETS_SSL_LOCAL_CERT="/home/server-account-name/laravel/ssl/1968979879_yourdomain.com.cert"

LARAVEL_WEBSOCKETS_SSL_LOCAL_PK="/home/server-account-name/laravel/ssl/1968979879_yourdomain.com.cert"
Again, do not forget the double quotes or you will get stuck…. :-(
7)Now the server part………in order for your websockets to work, the command below must autostart when your server restarts:
php artisan websockets:serve
To make this happen automatically, you will have to ask your host if you can have access to the supervisor. Supervisor is a small software that runs in the background of your web server, it can restart automatically many processes by launching the command you tell to.
On Centos OS, you will find it here:
etc/supervisor.d
8)Make sure you have queues setup in your Laravel app, queues will be used to keep track of jobs you send via the websockets requests.
To setup the queues on Laravel, follow this link:
https://laravel.com/docs/8.x/queues#introduction
To cut it short, I did this:
php artisan queue:table

php artisan migrate
The above will create a new table called “jobs” in your database.
In my .ENV file, I have setup the queue_connection variable to “database”
QUEUE_CONNECTION=database
Remember to always run these commands each time you change anything in your ENV file(copy/paste):
php artisan cache:clear
php artisan view:clear
php artisan config:clear
php artisan config:cache
php artisan route:cache
9)Create a new file called:
etc/supervisor.d/laravel-queues.ini
Paste the below code in it:
[program:laravel-queues-yourdomain]
command=/usr/bin/php /home/account-name/laravel/artisan queue:work
process_name =%(program_name)s_%(process_num)02d
numprocs=8
priority=999
autostart=true
autorestart=true
startsecs=1
startretries=3
user=account-name(add your server domain acocunt name here)
stdout_logfile=/var/log/supervisor/laravel-supervisor-lqueues-yourdomain.log


[program:websockets-yourdomain]
command=/usr/bin/php /home/account-name/laravel/artisan websockets:serve
numprocs=1
autostart=true
autorestart=true
user=account-name(add your server domain acocunt name here)
What will this do?
Supervisor will both start your Laravel queues and websocket server automatically.
Make sure supervisor restarts in order to register your new settings, here are the commands:
# Status of supervisor
sudo service supervisord status

# Start the service
sudo service supervisord start

# Stop the service
sudo service supervisord stop

# Restart the service
sudo service supervisord restart
10)You got the server set up, supervisor, your SSL.
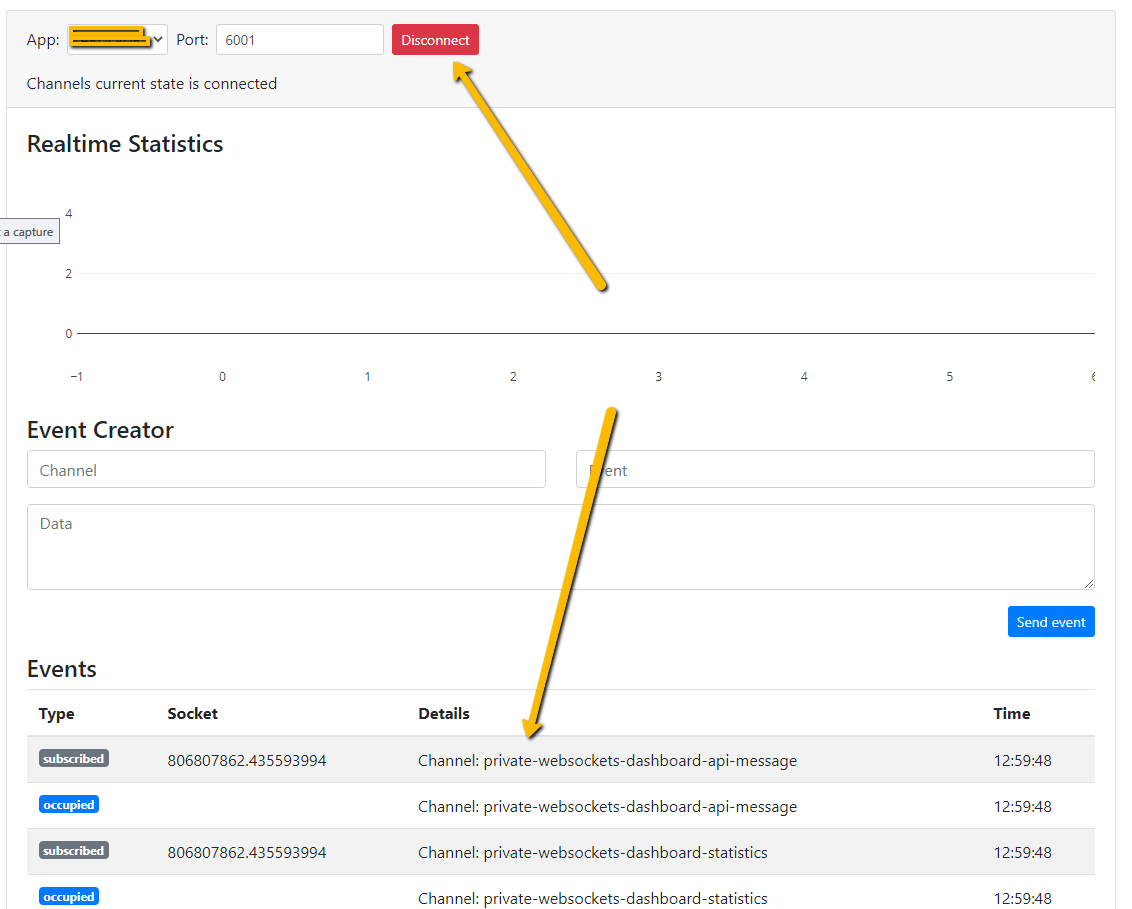
Time to check if the installation is working by going to this URL:
https://your-domain-name.com/laravel-websockets
11)If you have followed my tutorial perfectly and still cannot start the test page.
Contact your hosting provider and ask them to open your server firewall on port TCP in and out 6001.
Restart the firewall and try again.
If you still struggle, verify that your SSL files are correct, in the right place with the right paths and that you have double quotes on their paths in your ENV file.
Finally, if you still experience a problem, empty your Laravel cache with the commands I added at the bottom of step 8.
12)Let’s say that it is now working for you,
All you have to do now is create Laravel broadcast events and dispatch them to your database queue.
A broadcasting event will look like this:
message = $message;
    }

    /**
     * Get the channels the event should broadcast on.
     *
     * @return Channel
     */
    public function broadcastOn()
    {
        return new Channel('chat');
    }
}
In your vue js front end, add a listener like that:
mounted() {
    Echo.channel('chat')
        .listen('ListingChat', () => {
            this.getMessages();
        })
},
What will happen is that when you dispatch a broadcasting event to the queue, the listener will be made aware that message XXX has been sent to channel ‘chat'(or whatever name you want to use).
Upon receiving the event, you can then trigger in your callback, a method “this.getMessages()” in this case, to start an ajax call(ie:get all the message of user id xxx in your table).
That’s it!
I did all the hard work for you !!!!
Enjoy and remember, if you want to buy me a coffee, please feel free :-)
